Tuesday, May 21, 2019

How to remove TFS workspace mapping for a user

Introduction

In this article, you will know how to remove TFS workspace mapping for a different user. In a remote environment, multiple users log in to a remote machine and create their workspaces that cause an access conflict for mapped workspace folder.

Scenario

Today I faced an issue while trying to update a mapped TFS workspace in Visual Studio 2017. Visual Studio stops responding if I try to open “Source Control Explorer” and found that some different TFS user connects to TFS and mapped some folders on my local drive. Now I need to access that mapped workspace folder because I do not want to create another folder for myself.
I tried mapping same remote folder to my existing local folder and I got the following error:
“The working folder ‘Workspace_Folder_Local_Path’ is already in use by the workspace WORKSPACE_NAME:USER_NAME on computer ‘MACHINE_NAME’”

Remove TFS workspace user mapping

Prerequisites:

  • You should have administrative rights to the collection.
  • TF command. ( it is located at “C:\Program Files (x86)\Microsoft Visual Studio\2017\Professional\Common7\IDE” depend upon your Visual Studio version.

Steps to remove user workspace mapping

  • Run “Developer Command Prompt for VS 2017” from Start menu.
  • List the workspaces associated with the user using the below command:
      TF workspaces /collection:"http://tfsserver:8080/tfs/collection_name" /owner:owner_id
    
    This will return the list of workspaces owned by the user and computer they are associated with. For owner_id, you use the user name e.g. Niranjan Singh
  • To remove user workspace mapping, run the below command:
      tf workspace /delete workspacename;owner_id 
    
    Now it will confirm you to delete the user mapping. Enter 'y' to initiate the process.
    Remove TFS Workspace Mapping for a user

Conclusion

These are the steps to delete the TFS workspace mapping for a user.

How to deploy an Angular app to Github Pages

Introduction

In this article, you will learn to deploy an Angular application to GitHub Pages using npm angular-cli-ghpages package to easily.

Prerequisites:

This command has the following prerequisites for Installation & Setup:
  • Node.js 8.2.0 or higher which brings you npm 5.2.0 which brings you npx
  • Git 1.7.6 or higher
  • optional: Angular project created via angular-cli
  • An Angular 5 or above version application, which is working and ready to host. If it is not ready then follow the instructions specified in the below link for adding an existing angular project to GitHub. Adding an existing project to GitHub using the command line

References:

Steps to deploy to GitHub pages

To install the command run the following:
npm install -g angular-cli-ghpages
It is just two commands to publish your Angular application to GitHub pages.
ng build --prod --base-href https://[username].github.io/[repo]/
ngh --dir=dist/

Deploying using the Angular npm scripts

You can also automatically publish an application using npm by setting script in package.json. The build and deploy command in one go by following the below approach:
To install the command as your project dependencies run the following:
npm i angular-cli-ghpages --save-dev
Open your package.json and then, in your script section add the following script to deploy an Angular 7 application.
{
  "name": "ng-webgl",
  "version": "0.0.0",
  "scripts": {
    "ng": "ng",
    "start": "ng serve",
    "build": "ng build",
    "test": "ng test",
    "lint": "ng lint",
    "e2e": "ng e2e",
    "deploy:gh": "ng b --prod --base-href https://niranjankala.github.io/ng-webgl/ && npx ngh --dir=dist/"
  },
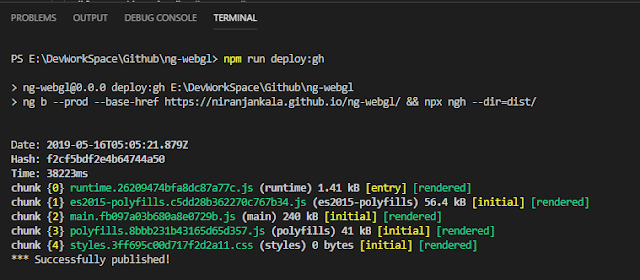
To execute this deploy script. Run npm run deploy:gh on the root of your project directory.
Publish Github-pages
Note: In order to compile images correctly use the relative path './assets/images/image.png'

Conclusion

There are the steps to publish Angular application the GitHub pages.

Thursday, April 25, 2019

Create Ionic 4 release build for Android

Introduction

In this article, you will learn how to create ionic 4 release build for the Android platform.

What is Ionic?

Ionic framework is the free, open-source toolkit for developing high-quality cross-platform apps for native iOS, Android, and the web—all from a single codebase. It allows us to develop UI using the famous frameworks e.g Angular, Vue.js, React, etc.

Setting up release build for Android platform

Steps 1 - Run “npm install” on the root directory
Steps 2 - Add android platform with the CLI:
ionic platform add android
Steps 3 - If you are working in a distributed development environment then make sure to install the required files. Run ionic cordova prepare command. it will Install platforms and plugins listed in “config.xml”.
ionic cordova prepare android**
Steps 4 - Now navigate to platforms/android with the CLI :
cd platforms/android
Create/Copy release signing key store file under platforms/android folder Copy the created Key store file for android application if you already have otherwise generate a key.store file with the CLI and answer all the questions:
keytool -genkey -v -keystore YourApp.keystore -alias YourApp -keyalg RSA -keysize 2048 -validity 10000
Follow the steps suggested in the documentation for Deploying to a Device.

Create/Specify release signing information

Steps 1 - Create a file with name “release-signing.properties” under “platforms\android” folder.
Steps 2 - Add below information to this file:
key.store=YourApp.keystore
key.store.password=<YourApp keystore password>
key.alias=YourApp
key.alias.password=<YourApp alias password>

Create build for application

Now go back to the root of your Ionic project with the CLI and build a release version:
ionic cordova build android --prod --release
If command run successfully then you will find release APK under – APP_Root_Folder\platforms\android\app\build\outputs\apk\release

Reset plugins and platforms

To install Or reinstall all cordova plugins In Package.json with Ionic, Run this command on windows command prompt with administrator privilege
rd  plugins /d/s && rd platforms /d/s  && ionic cordova prepare

Conclusion

There are the steps to create a build for ionic 4 application and then you can host your application on Android store.

Thursday, April 18, 2019

How to send email in Orchard CMS


Introduction


In this article, you will learn how to send email in Orchard CMS using it's out of box services.

Steps to send email in Orchard CMS

  • Create Email wrapper template
  • Create Email Template
  • Inject required orchard services in the Controller or Custom Service
  • Specify email template to use and pass data
  • Sending email using MessageService
To demonstrate the scenario, we take the example of sending a challenge email to verify the user email address. In Orchard. Users module, you will find all this code to send an email using orchard services.

Steps 1 - Create Email wrapper template


It applies default Body alteration for SmtpChannel which create the body of HTML template. create a new file "Template.User.Wrapper.cshtml" under Views folder.
@* Override this template to alter the email messages sent by the Orchard.Users module *@
@Display.PlaceChildContent(Source: Model)

Steps 2 - Create Email Template


Now create the content of the email. It applies default Body alteration for SmtpChannel which create the body of HTML template. create a new file "Template.User.Validated.cshtml" under Views folder. It is the same razor view page where we can pass the data and place on the place holders. e.g. Model.ContactEmail is the address of the contact person of the website.
@T("Thank you for registering with {0}.<br /><br /><br /><b>Final Step</b><br />To verify that you own this e-mail address, please click the following link:<br /><a href=\"{1}\">{1}</a><br /><br /><b>Troubleshooting:</b><br />If clicking on the link above does not work, try the following:<br /><br />Select and copy the entire link.<br />Open a browser window and paste the link in the address bar.<br />Click <b>Go</b> or, on your keyboard, press <b>Enter</b> or <b>Return</b>.", Model.RegisteredWebsite, Model.ChallengeUrl)
@if (!String.IsNullOrWhiteSpace(Model.ContactEmail)) {
    @T("<br /><br />If you continue to have access problems or want to report other issues, please <a href=\"mailto:{0}\">Contact Us</a>.",Model.ContactEmail)
}

Steps 3 - Inject required orchard services in the Controller or Custom Service


To render the email template, we need to use a few orchard services. In Orchard CMS every view object is a shape so we need to create a shape using our created template views. We need to inject IShapeService and IShapeFactory to create the shape for the email content. IMessageService required to send the email through the SMTP channel.
namespace Orchard.Users.Services {
    public class UserService : IUserService {
        private readonly IMessageService _messageService;
        private readonly IShapeFactory _shapeFactory;
        private readonly IShapeDisplay _shapeDisplay;
        public UserService(
        IMessageService messageService, 
        IShapeFactory shapeFactory,
        IShapeDisplay shapeDisplay) {

            _messageService = messageService;
            _shapeFactory = shapeFactory;
            _shapeDisplay = shapeDisplay;
        }
        ...

Steps 4 - Specify email template to use and pass data


At this step, we specify the email and wrapper template to create the Shape for HTML content. In below line of code ShapeFactory.Create method takes the first parameter for the email template then we add email wrapper template in the template metadata. Along with this, we pass the model data using the anonymous object.
var template = _shapeFactory.Create("Template_User_Validated", Arguments.From(new {
    RegisteredWebsite = site.As<RegistrationSettingsPart>().ValidateEmailRegisteredWebsite,
    ContactEmail = site.As<RegistrationSettingsPart>().ValidateEmailContactEMail,
    ChallengeUrl = url
}));
template.Metadata.Wrappers.Add("Template_User_Wrapper");

Steps 5 - Sending email using MessageService


Now specify the mail message Subject, Body and Recipients of the email message. You can also specify attachments also. Just add the "Attachments" key and List as value to the parameters dictionary. Attachment should be the file path to attach with the email message.
var parameters = new Dictionary<string, object> {
                    {"Subject", T("Verification E-Mail").Text},
                    {"Body", _shapeDisplay.Display(template)},
                    {"Recipients", user.Email}
                };

        _messageService.Send("Email", parameters);
Below is the complete code for method which sends the challenge email:
public void SendChallengeEmail(IUser user, Func<string, string> createUrl) {
   string nonce = CreateNonce(user, DelayToValidate);
   string url = createUrl(nonce);

   if (user != null) {
       var site = _siteService.GetSiteSettings();

       var template = _shapeFactory.Create("Template_User_Validated", Arguments.From(new {
           RegisteredWebsite = site.As<RegistrationSettingsPart>().ValidateEmailRegisteredWebsite,
           ContactEmail = site.As<RegistrationSettingsPart>().ValidateEmailContactEMail,
           ChallengeUrl = url
       }));
       template.Metadata.Wrappers.Add("Template_User_Wrapper");
       
       var parameters = new Dictionary<string, object> {
                   {"Subject", T("Verification E-Mail").Text},
                   {"Body", _shapeDisplay.Display(template)},
                   {"Recipients", user.Email}
               };

       _messageService.Send("Email", parameters);
   }
}

Conclusion

I guess that's all to send an email in Orchard CMS.

Thursday, January 24, 2019

How to enable docker support ASP.NET applications in Visual Studio

Introduction

In this article, you will know that how to enable docker support for ASP.NET application in Visual Studio. We will create an ASP.NET Core application docker support and also enable docker support in an existing application.

Prerequisites

  • Docker for Windows
  • Visual Studio 2017 or later with the .NET Core cross-platform development workload

Enable Docker support in a new application

You can get Docker support in your project when you create a Visual Studio web project, either. NET Core or the full framework. If you choose the .NET Core framework, you get the option to add Docker support in the new project wizard but for the full framework, we can add Docker support later context menu “Solution Explorer”. See below steps to create a .NET Core project with Linux container support:

clip_image001

Docker tools in Visual Studio understand the difference between. NET Core and the. NET full framework so the generated files will nicely reflect those different targeted platforms.

To add Docker support for the full framework, go through previous post - Containerizing a .NET application

Enable Docker support in a new application

You add Docker support after creating a project is by right-clicking the project in the “Solution Explorer” and then select “Docker Support” option under the Add submenu.

clip_image003

Visual Studio will add DockerFile and .dockerignore to the project that will be used to build a docker container image starts with a reference to the base image dotnet:2.2-aspnetcore-runtime.

clip_image005

Note: To build this container, you need to switch the Docker tools for Windows on your machine to run Linux containers. If it is targeting to different operating system type, then you would get errors during the build since you can't mix Linux containers with Windows containers.

Docker support also added the generated YAML files. YAML files can be used together with docker-compose to execute Docker commands to a set of containers instead of only one at a time so that multiple container can work together for the microservices scenarios.

docker build -f "D:\DevWorkSpaces\GitHub\WebDevLearning\WebDev\WebDev.Containerized.MVCWeb\Dockerfile" -t webdevcontainerizedmvcweb:dev

clip_image007

Build Docker image from CLI

Open command prompt in administrative mode and run the below command  in project folder:

C:\Users\niranjansingh\Source\Repos\WebDevLearning\WebDev\WebDev.AspNETMVC>docker build .

clip_image001

Running application under Docker Environment

For .NET Core framework applications, Just run the application by selecting the Docker option just after the Run arrow button. After that application will build and create Docker image according to the settings provided in the DockerFile.

clip_image009

For my case application is targeting “Linux” and Docker for Windows on my system is configured to run the Windows contains so it will not build my case. So, remember to switch particular target Operating system containers before you build the application.

For a .NET framework application, make docker-compose as startup project. After this modify the .yml files to build and run the contains.

image

You will see Docker Compose button on the place of “Docker” in .NET full framework applications.

image

Click on Debug button to let the docker decompose to build and run the docker image on the bases of yml file configuration.

Wednesday, January 16, 2019

How to use Angular Lifecycle hooks

A component has a lifecycle which is managed by Angular. Below are the Angular component life cycle hooks:
  1. Create
  2. Render
  3. Create/Render child components
  4. Process Changes
  5. Destroy

Angular creates the component then renders it. After that it get the creates and renders its child components. If there are any changes in component’s data bound properties then processes changes and at last destroys it before removing its template from the DOM.
Angular provides a set of lifecycle hooks and below are few of them:
  1. OnInit – it is used to perform component initialization and it is used to perform any component initialization after Angular has initialized the data bound properties. It is a good place to retrieve the data for the template from a back-end service.
  2. OnChanges - It is used to perform any action after Angular sets data bound input properties.
  3. OnDestroy – This lifecycle hook to perform any clean-up before Angular destroys the component.

Using Angular Lifecycle Hooks

To use a lifecycle hook, you have to follow the below steps:

Implement the lifecycle hook interface

Angular provides several interfaces you can implement, including one interface for each lifecycle hook. For example, the interface for the OnInit lifecycle hook is OnInit.
export ProductListComponent implements OnInit {

Import Lifecycle hook from Angular packages

You have to import the lifecycle hook interface. Include OnInit in the import statement with Component as below
import { Component, OnInit } from '@angular/core';

Implement lifecycle hook method

After that you have to implement lifecycle hook method. Lifecycle hook interface defines one method which has name prefixed with ng with interface name. For example, the OnInit interface hook method is named ngOnInit.
ngOnInit() { // Some code here } 
Complete component declaration:
import { Component, OnInit } from '@angular/core';

@Component({
selector: 'pm-products',
templateUrl: './product-list.component.html',
styleUrls:['./product-list.component.css']
})
export class ProductListComponent implements
{
constructor() { }
ngOnInit() { }
}
In this you can use another Angular Lifecycle hooks to implement required functionality at particular event.