Showing posts with label Visual Studio. Show all posts

Tuesday, May 21, 2019

How to remove TFS workspace mapping for a user

Introduction

In this article, you will know how to remove TFS workspace mapping for a different user. In a remote environment, multiple users log in to a remote machine and create their workspaces that cause an access conflict for mapped workspace folder.

Scenario

Today I faced an issue while trying to update a mapped TFS workspace in Visual Studio 2017. Visual Studio stops responding if I try to open “Source Control Explorer” and found that some different TFS user connects to TFS and mapped some folders on my local drive. Now I need to access that mapped workspace folder because I do not want to create another folder for myself.
I tried mapping same remote folder to my existing local folder and I got the following error:
“The working folder ‘Workspace_Folder_Local_Path’ is already in use by the workspace WORKSPACE_NAME:USER_NAME on computer ‘MACHINE_NAME’”

Remove TFS workspace user mapping

Prerequisites:

  • You should have administrative rights to the collection.
  • TF command. ( it is located at “C:\Program Files (x86)\Microsoft Visual Studio\2017\Professional\Common7\IDE” depend upon your Visual Studio version.

Steps to remove user workspace mapping

  • Run “Developer Command Prompt for VS 2017” from Start menu.
  • List the workspaces associated with the user using the below command:
      TF workspaces /collection:"http://tfsserver:8080/tfs/collection_name" /owner:owner_id
    
    This will return the list of workspaces owned by the user and computer they are associated with. For owner_id, you use the user name e.g. Niranjan Singh
  • To remove user workspace mapping, run the below command:
      tf workspace /delete workspacename;owner_id 
    
    Now it will confirm you to delete the user mapping. Enter 'y' to initiate the process.
    Remove TFS Workspace Mapping for a user

Conclusion

These are the steps to delete the TFS workspace mapping for a user.

Thursday, January 24, 2019

How to enable docker support ASP.NET applications in Visual Studio

Introduction

In this article, you will know that how to enable docker support for ASP.NET application in Visual Studio. We will create an ASP.NET Core application docker support and also enable docker support in an existing application.

Prerequisites

  • Docker for Windows
  • Visual Studio 2017 or later with the .NET Core cross-platform development workload

Enable Docker support in a new application

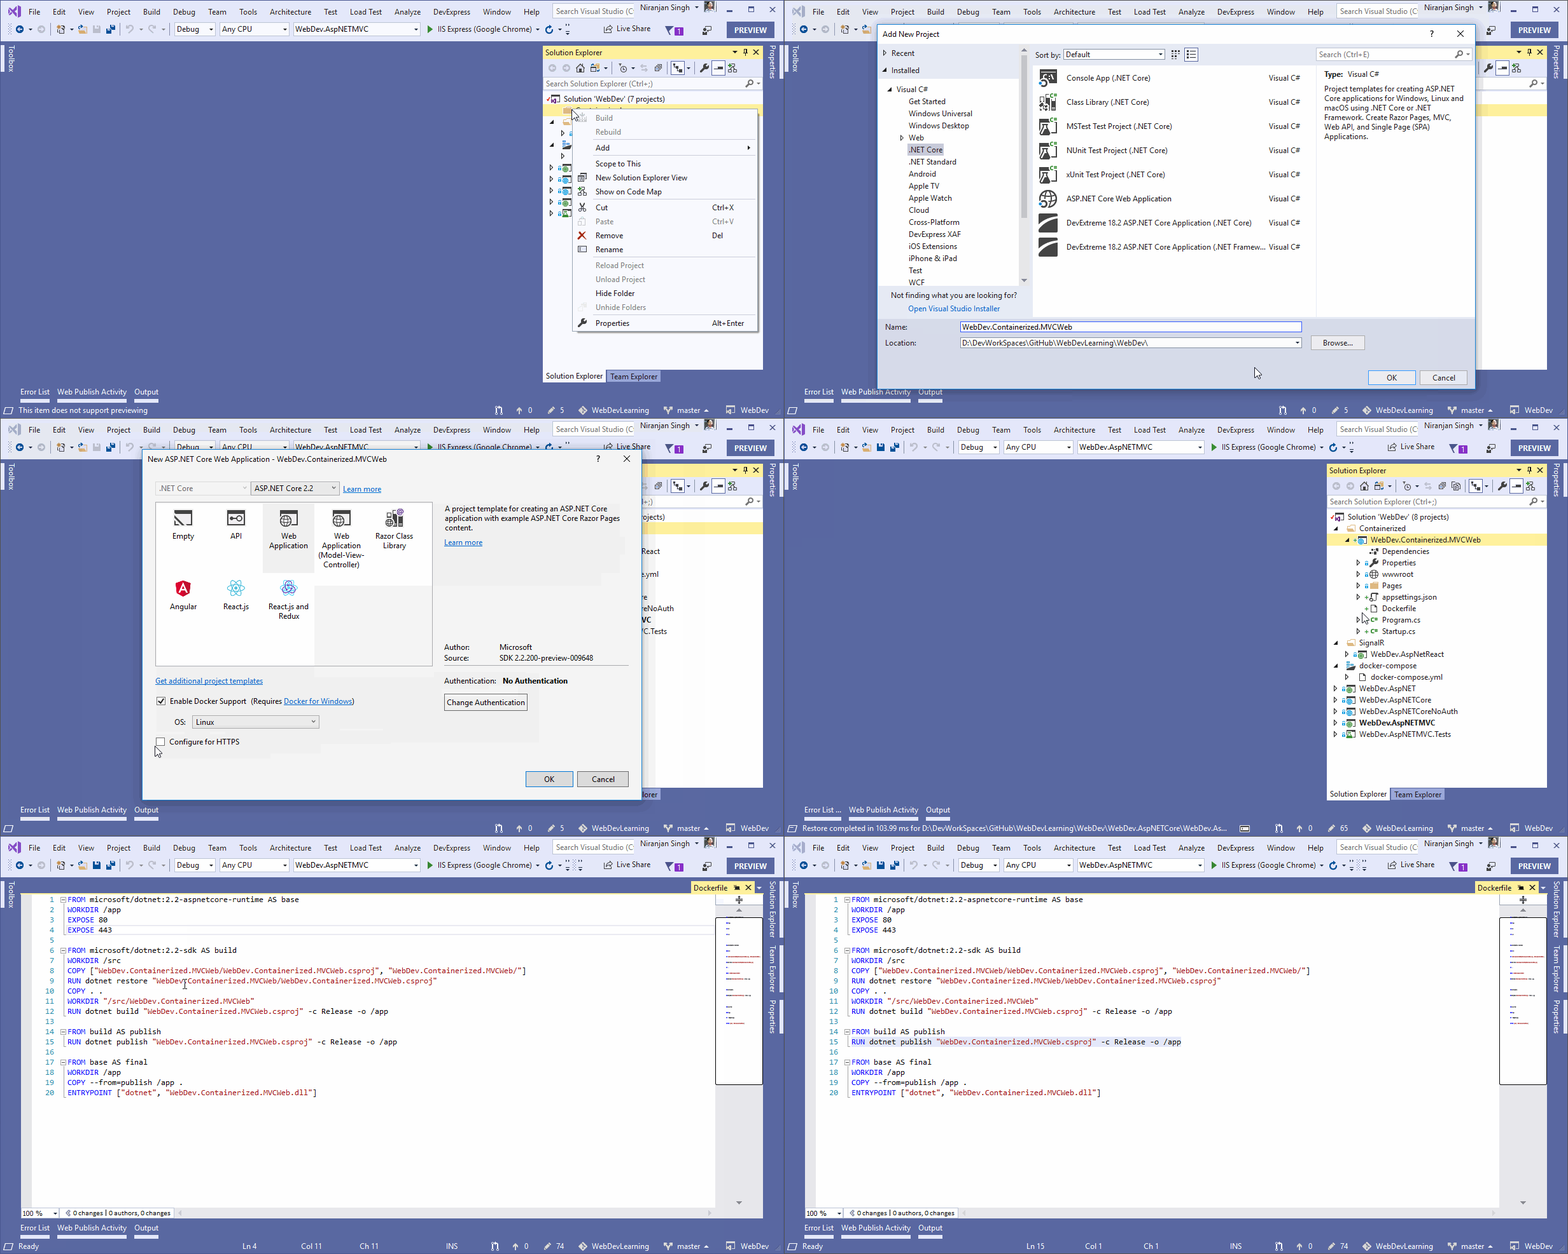
You can get Docker support in your project when you create a Visual Studio web project, either. NET Core or the full framework. If you choose the .NET Core framework, you get the option to add Docker support in the new project wizard but for the full framework, we can add Docker support later context menu “Solution Explorer”. See below steps to create a .NET Core project with Linux container support:

clip_image001

Docker tools in Visual Studio understand the difference between. NET Core and the. NET full framework so the generated files will nicely reflect those different targeted platforms.

To add Docker support for the full framework, go through previous post - Containerizing a .NET application

Enable Docker support in a new application

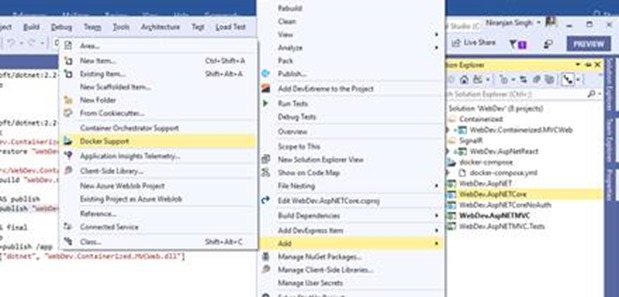
You add Docker support after creating a project is by right-clicking the project in the “Solution Explorer” and then select “Docker Support” option under the Add submenu.

clip_image003

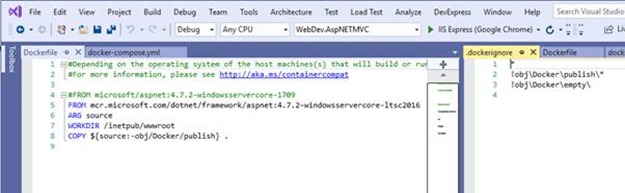
Visual Studio will add DockerFile and .dockerignore to the project that will be used to build a docker container image starts with a reference to the base image dotnet:2.2-aspnetcore-runtime.

clip_image005

Note: To build this container, you need to switch the Docker tools for Windows on your machine to run Linux containers. If it is targeting to different operating system type, then you would get errors during the build since you can't mix Linux containers with Windows containers.

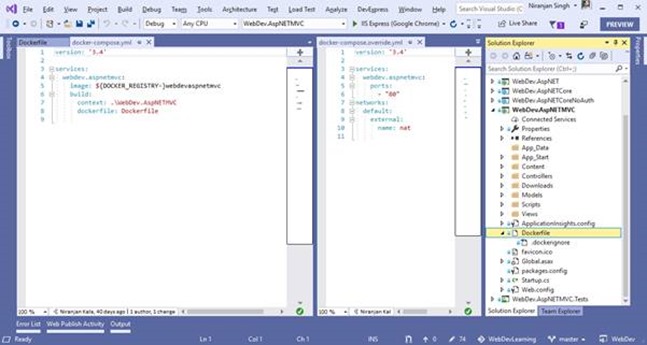
Docker support also added the generated YAML files. YAML files can be used together with docker-compose to execute Docker commands to a set of containers instead of only one at a time so that multiple container can work together for the microservices scenarios.

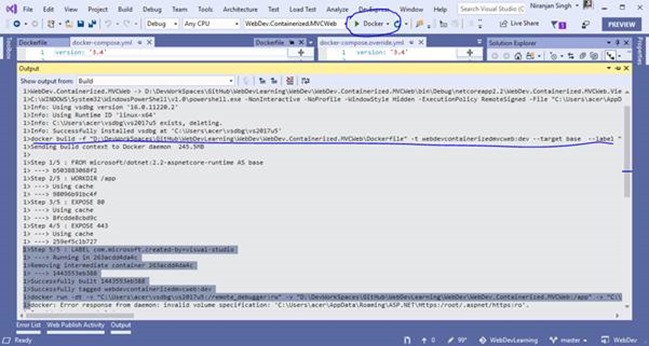
docker build -f "D:\DevWorkSpaces\GitHub\WebDevLearning\WebDev\WebDev.Containerized.MVCWeb\Dockerfile" -t webdevcontainerizedmvcweb:dev

clip_image007

Build Docker image from CLI

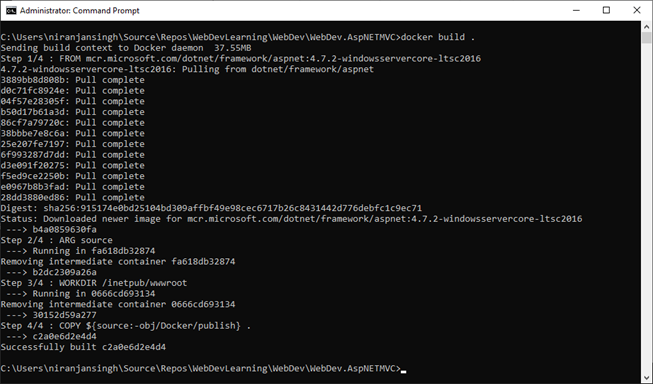
Open command prompt in administrative mode and run the below command  in project folder:

C:\Users\niranjansingh\Source\Repos\WebDevLearning\WebDev\WebDev.AspNETMVC>docker build .

clip_image001

Running application under Docker Environment

For .NET Core framework applications, Just run the application by selecting the Docker option just after the Run arrow button. After that application will build and create Docker image according to the settings provided in the DockerFile.

clip_image009

For my case application is targeting “Linux” and Docker for Windows on my system is configured to run the Windows contains so it will not build my case. So, remember to switch particular target Operating system containers before you build the application.

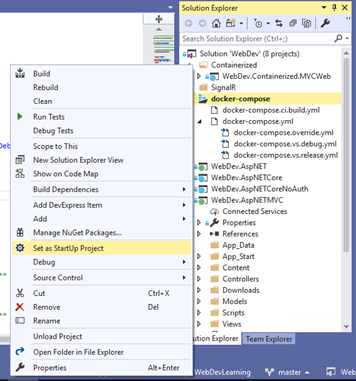
For a .NET framework application, make docker-compose as startup project. After this modify the .yml files to build and run the contains.

image

You will see Docker Compose button on the place of “Docker” in .NET full framework applications.

image

Click on Debug button to let the docker decompose to build and run the docker image on the bases of yml file configuration.

Tuesday, December 4, 2018

Visual Studio 2019 with more developer productive features

Microsoft announced the availability of Visual Studio 2019 Preview 1 in the Microsoft Connect(); 2018 keynote. Download is now available for both Windows and Mac platform.

What New Features bring with Visual Studio 2019

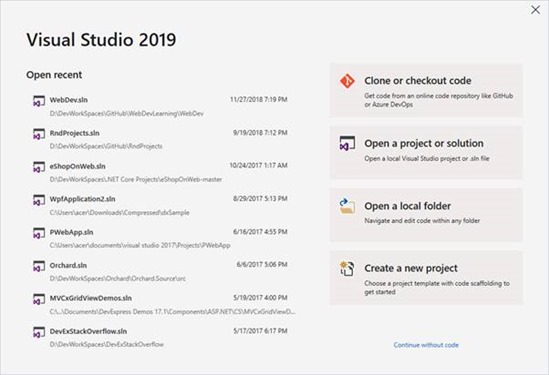
Visual Studio 2019 launched with faster tooling, enhanced collaboration and productivity improvements. The public preview 1 includes a new start window experience to get developers into their code faster, a new search experience, increased coding space smarter debugging, AI-powered assistance with IntelliCode, increased refactoring capabilities, and built-in access to Visual Studio Live Share.

clip_image002

Below the list of improved features

Source: Visual Studio 2019 Preview

Intellicode and One-click Code Cleanup

Drive code maintainability and fix warnings and suggestions with one-click code clean up, and use more refactoring capabilities than ever.
clip_image004

Live Share and PR Experience

you can collaborate in real-time whether your team members are working from home or across the world. Live Share installs by default and supports all projects, app types, and languages.

clip_image006

When you’re ready to check in your code, try the new pull request (PR) experience. It lets you and your team quickly review code (even run the app and debug!) from Azure Repos directly in the IDE.

Search Window and Snapshot Debugger

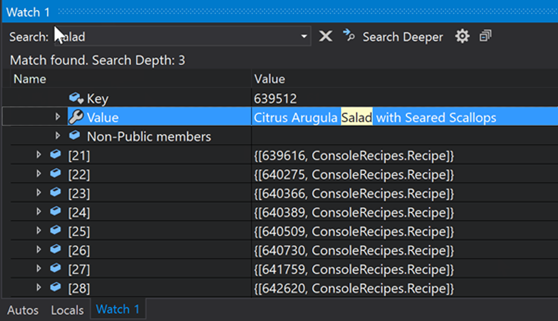
Improved stepping performance and support for large C++ apps enhance your debugging experience. New search capabilities in Autos, Locals, and Watch windows help you find objects or values, or visualize Collections.

clip_image008

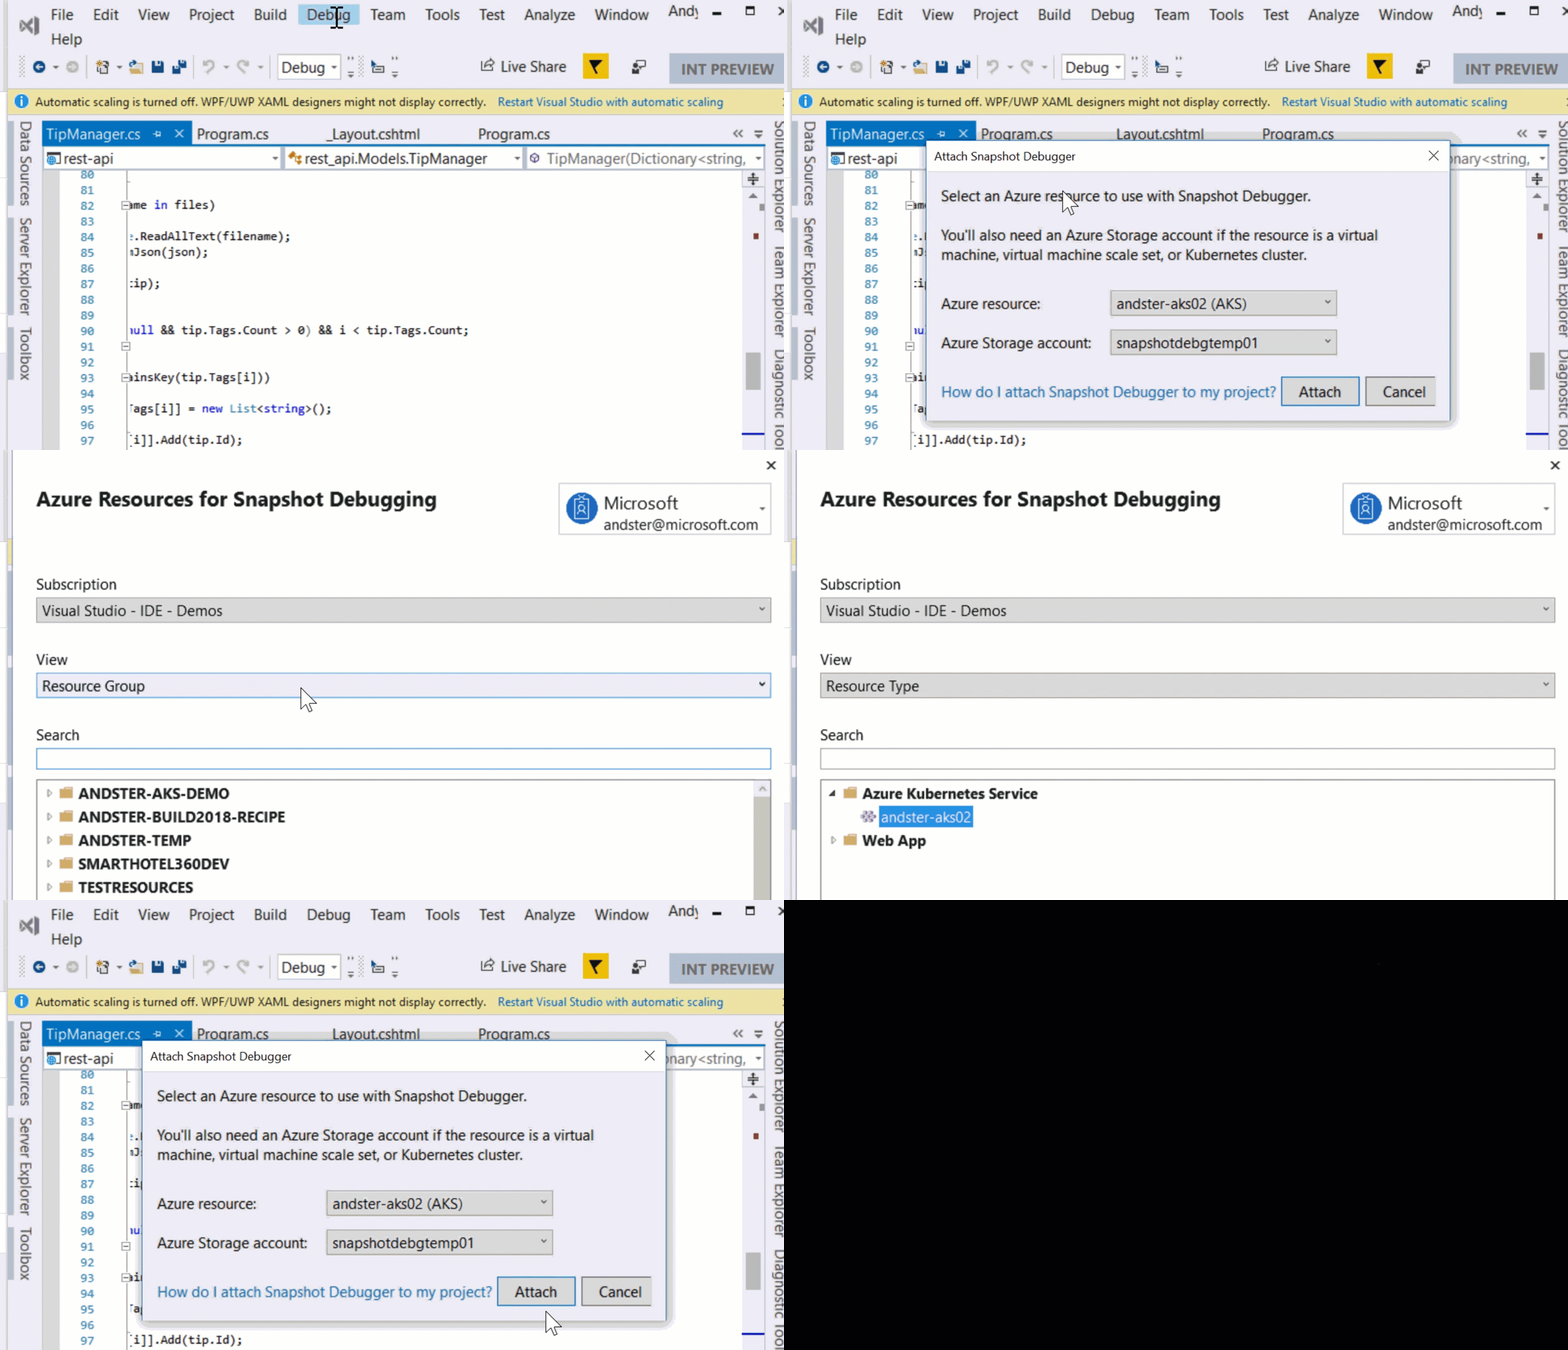
With new app targets for Snapshot Debugger, you can debug issues in a production environment without impacting performance or stability. It takes a snapshot of the environment so you can inspect objects and call stacks.

clip_image009

Connected Services and Azure App Services

Configure your applications to use Azure services with just a few clicks. You can create new instances of Azure Storage, Key Vault, Cognitive Services, and more without ever leaving the IDE.

clip_image010

Start developing your code locally and offline until you are ready to deploy. Then publish directly to Azure in minutes, not hours, targeting virtual machines, containers, or Azure App Service.

clip_image012

.NET Core 3 and C++ Improvements

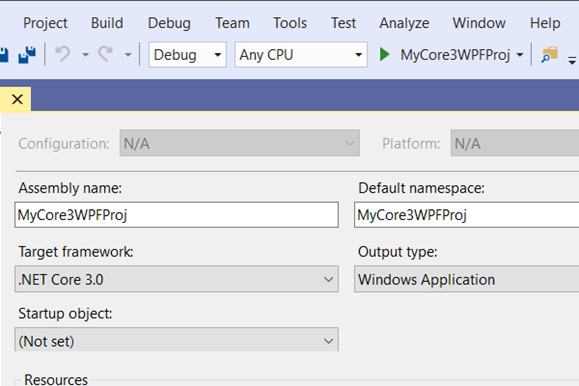
Visual Studio 2019 gives your current projects the full-fledged support they need across any platform including desktop, web, mobile, and games. It also supports .NET Core 3, one of the fastest frameworks on the planet.

clip_image013

With support for Linux targeting, and CMake and ClangFormat support, Visual Studio 2019 is the most complete IDE for C++ developers. C# and F# developers can build native cross-platform apps with Xamarin.


clip_image015


Happy Coding

Wednesday, September 19, 2018

Enable code preview with the Visual Studio enhanced scroll bar

Introduction
This is the first time that I saw code preview through scrollbar in Visual Studio. I have use most of the Visual Studio IDE starting from Visual Studio 2002 and scrolling of code files done using the classic scrollbar.
Starting from Visual Studio 2013, an enhanced scrollbar feature is enabled but I was not aware of it till now. Recently I saw below code preview features through a wide scrollbar:
image
Enabling Visual Studio scrollbar code preview mode
By default, this feature is not enabled so that I have not used this cool feature before. Actually, it requires to switch the scrollbar mode and below are the steps to switch scrollbar mode:
  1. Open option using Tools menu and select “Options”
  2. In the options dialog select the Text Editor | All Languages | Scroll Bars node from left side menu
  3. Now change the scrollbar behavior to map mode and check the “Show Preview Tooltip” checkbox as shown in below image.
    Visual Studio enhanced scrollbar
I found it a cool feature which enables the developer to view the see the code in tool-tip by hovering on the scrollbar without scrolling down to the bottom of the code file.

You can find detailed information at Visual Studio scroll bar customization documentation.


Friday, August 24, 2018

Create/Update an offline installation of Visual Studio 2017

Introduction
In this article we learn that how to create an offline installer for Visual Studio 2017. Recently Visual Studio 2017 version 15.8 Released and then i have updated Visual Studio 2017 on my laptop. I have another machine which does not connect with high speed internet so I need to install Visual Studio through offline installer (ISO).

Microsoft designed Visual Studio 2017 installer to install specific modules (workload-based model) and allows to install minimal set of features to start development using Visual Studio.

Create Visual Studio 2017 offline installation media
Step 1 – Download the Visual Studio installer setup
It is recommended to use Visual Studio web installer because it will always install/ update to the latest version of the Visual Studio 2017.

Visual Studio 2017 Installer

Download the latest version of Visual Studio 2017 Web installer by clicking below links
Visual Studio Community 2017 | Visual Studio Professional 2017 | Visual Studio Enterprise 2017


Visual Studio 2017 Installer

Step 2 – Create/ Download installation setup files
To create updated version installation for Visual Studio, use the below command create or update the existing installation layout to a newer version. You don't have to specify any additional command-line parameters.
vs_enterprise.exe --layout d:\vs2017ent
It will create a complete local installation media for Visual Studio 2017 with all features and definitely it will take lots of time to download all the work loads.
You can also specify the language at the Visual Studio to download so that it will download installation files for the specified set of languages only
vs_enterprise.exe --layout d:\vs2017ent --lang en-US
In my case, I have already downloaded Visual Studio 2017 installation files earlier. This time I need to update this installation layout to transfer update on my offline computers.

image

Once the offline installation files saved at the specified location then transfer it on another computer and ready to install the Visual Studio 2017.

clip_image002

Click the vs_setup.exe file to start the installer then install the Visual Studio after selecting the required development environment features you want to install.

Clean up previous version obsolete package


During the update process of existing Visual Studio installation files, my computer drive gets full and some of the packages failed to download. I checked the installation layout folder and found that there are previous version packages also exists. I have removed few of them manually to complete the download process.

Visual Studio installations files folder size incrementally increase whenever we update the existing installation files. Visual Studio installation folder may have some obsolete packages that are no longer needed by the latest Visual Studio installation.

You can use the --clean option to remove obsolete packages from an offline cache folder.

Step 1 – Find file path(s) to catalog manifest(s) that contain those obsolete packages

You can find the catalog manifests in an "Archive"folder in the offline layout cache. They are saved there when you update a layout. In the "Archive" folder, there is one or more "GUID" named folders, each of which contains an obsolete catalog manifest. The number of "GUID" folders should be the same as the number of updates made to your offline cache.

Step 2 - Run the “—clean” command by supplying the files paths to these catalogs


vs_enterprise.exe --layout d:\vs2017ent --lang en-US --clean d:\vs2017ent\Archive\d88a0497-7bee-42ad-8ea5-3361cd52e075\catalog.json


References:
Create an offline installation of Visual Studio 2017
Install Visual Studio 2017 on low bandwidth or unreliable network environments
Update a network-based installation of Visual Studio


Monday, October 30, 2017

How to fix error TFS connection error "You are not authorized to access …"

In this article we will know that how to fix the error when connecting a project collection in Visual Studio with Source Control Explorer open (TF30063: You are not authorized to access… project)

Scenario:
Recently, I must change my Active Directory account password due to password policy which force the user to change the password after few days. In my development environment TFS require AD credentials to connect with TFS services.

Solution:
Peoples from developer community suggested various ways to solve this issue. Few of them explained as below:

  1. One probable solution is clearing the Internet explorer 9 and above cache completely. The Team Foundation Server login apparently uses Internet Explorer which can be launched from Visual Studio though and It may conflict or try to match with cached credentials. After the cache clearing, Visual Studio ask to the correct login details screen or authenticate automatically.

    clip_image001

    Now logout from portal and login again with updated credentials

    clip_image003
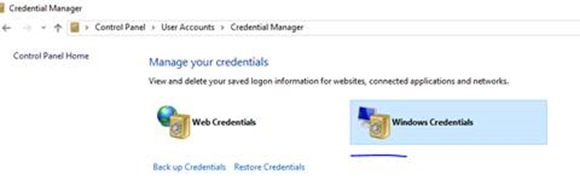
  2. In my case removing the entry from credential manager which cached the previous password for the TFS connection.

    clip_image005

    Find and remove entry from web or Windows credentials where you find for your TFS service. I need to remove it from Windows Credentials

    clip_image007

    Restart Visual Studio and Then it worked again.
  3. Sometimes this problem gets resolved by clearing TFS cache from below location "C:\Users\%UserName%\AppData\Local\Microsoft\Team Foundation\7.0\Cache". Just press Win+R on keyboard and paste this path. Remove the cache and reconnect TFS with valid credentials again. It works if you are using multiple logins to connect the TFS Services.

Conclusion:

We have discovered ways to solve the TFS issue. It may work one of them to someone’s problem.

Tuesday, March 7, 2017

Visual Studio 2017 Launched with new features…

Currently Visual Studio 2017 launch 20th Anniversary event is still running on 7 and 8 March. One day still left to  explorer know that what Microsoft brought in this version. There are lots improvement in this version of Visual Studio.

First one is the New Installation user interface which make it easier for you to select and install just the features you need. You can select individual components that you want to use in development environment.

image

image

Visual Studio has been optimized to reduce startup time and solution load time. The very first launch of Visual Studio is at least 50% faster.

Improved Code Navigation
There are huge improvements to code navigation features in Visual Studio 2017. It is changed to “Go To All (Ctrl +, or Ctrl + T)” lets you quickly find and go to files, types, methods, and other elements in your code. It allows you to locate items of any kind, even in large code bases. Go To Line is also improved.
  • Structure Guide Lines are now drawn in the editor so that you can easily visualize the structure of the code that you are working in. On mouse hover, a tooltip is displayed containing the context of the current code block relative to its ancestor blocks. Structure Guide Lines are currently supported for C#, Visual Basic, and XAML files, and for any files supported via TextMate grammars. This feature may be disabled in the Tools > Options dialog by unchecking the Show structure guide lines checkbox under the Text Editor > General category.

Coding Convention Support Via EditorConfig

The Visual Studio 2017 editor now supports EditorConfig, which allows developers to define and maintain consistent coding style conventions between different editors and IDEs. See documentation for more details, and .NET documentation for information on how to use .editorconfig files to govern your .NET code style. See known issues for limitations in EditorConfig support in this release.

Read this nice article - Code Style Configuration

Code Refactor improvement

Visual Studio provides lots of refactorings to help you be productive and make your code more readable. for example,

  • Simplify object initialization with an initializer.
  • Use specific type rather than var.
  • Convert String.Format to string interpolation [ “AA” + abc.ToString() to string.Format(“{0}{1}”, “AA”, abc.ToString()],
  • Convert property to a method, and vice versa.
  • Move class declaration to another file.

There are lots refactoring features included in Visual Studio 2017 which are provided by third-party tools e.g. Redgate Refactor and DevExpress CodeRush. I am using DevExpress CodeRush for these features but some theme are already exists in Visual Studio 2017. It is really good that some basic refactoring features now part Visual Studio itself.

Debugging and Diagnostics

Now Visual Studio has significant changes in this section also.. Check few of them below:

Run to Click

Simply click the icon next to a line of code while debugging to run to that line. No longer set temporary breakpoints or perform several steps to execute your code and stop on the line you want. Now while stopped at a break state under the debugger, the Run to Click icon subtly appears next to the line of code that your mouse is hovered over. Move your mouse to the icon and click the button, now your code will run and stop on that line the next time it is hit in your code path. Turn it off from Debug> Options > Enable Run to Click.

Debug_Run_Right_Click

The New Exception Helper

Use the new Exception Helper to view your exception information at a glance in a compact non-modal dialog with instant access to inner exceptions. Read this blog post for more detailed information on the new benefits of the Exception Helper.

Live Unit Testing is the interesting one which captured my eyes during the first day launch event. It visualize unit testing results and code coverage live in the editor. A symbol is shown whether this line of code pass the unit test or not. It also shows that this line of code is captured by unit test or not.

There are lots features added in newer version of Visual Studio. It looks like ultimate editor for developers.

Tuesday, July 26, 2016

How to add Intellisense to Visual Studio Code for bootstrap

Peoples who are habitual of using intellisense in Visual Studio and suddenly it is found missing then they really get mad during the work. Today I am trying to create some html pages with bootstrap for learning. I was feeling little hard to do code with bootstrap, because I am not able remember all of the class names of the bootstrap.

There are lots of glyphicon classes which is hard to remember. Visual Studio has this nice feature by adding JavaScript library path to the “_references.js” file and after that everything available in autosuggest mode.

What happened with me, I am not able to find the correct gylphicon class name without intellisense. Regarding this I have googled and found that this feature is not currently available in VS Code right now. However, it has been added as a feature request for upcoming updates.

Do not disappoint, There is also hope to do work with intellisense in VSCode. You can use extension"HTML CSS Class Completion".

Open Command Palette by press ctrl+ship+p Then run  “ext install HTML CSS Class Completion” to install this extension. Check the results in below image to see after enabling this extension.

image

Happy coding!

Thursday, July 21, 2016

Create and preview website page using Visual Studio Code

Today is the first day when i have used Visual Studio code after uninstalling the Bracket. Bracket has nice feature live preview to run the html document in the browser. I was expecting the same in Visual Studio code but it took me half an hour to figure that how to run the html from VSCode. VSCode use Node.js for most of the work to be done.
Finally i have figure out that how to start a small project, containing only a single HTML file in VSCode and edit it with preview in a browser similar to live preview feature in Bracket. I have all my tools setup to start creating my first project in VSCode but if you are not installed VSCode and Node.js then download VSCode and Node.js.  You can find little bit information to install Node.js here.
After you have done installation of the Node.js, either you need to setup the PATH variables in windows or the setup automatically done this work for you. You can verify this by typing below command on command prompt that Node package manager is globally accessible or not:
npm -v
Now it the right time to setup the webserver. Run the below command on the command prompt:
npm install -g live-server
image_thumb[3][9]
Now create a html file in VSCode configured folder.
image_thumb[6][9]
To preview the html document, run the below command at the project folder.
live-server

image_thumb[10][9] It is also possible to see the live preview in VSCode split windows. You have follow below steps to do this:
  1. Create a live-view.md file with this in it (Place it wherever you want. I put it at the base folder of all my projects since I can use it for whatever I'm currently working on):
    <div style="border:1px solid #777;
    position:absolute;left:10px;top:10px;bottom:10px;right:10px;">
    <iframe src="http://localhost:8080/"; width="100%" height="100%" frameborder="0" />
    </div>
  2. Open live-view.md in the second/split pane in VS Code and click the "Open preview" button (top right of file).
Happy coding.

Tuesday, July 5, 2016

“Object reference not set to an instance of an object” after install of Visual Studio 2015 Update 3.

Yesterday I have installed update 3 for Visual Studio  2015 Community edition. At that time set failed due to internet disconnection during the installation. Somehow setup completed but when Visual studio was not working correctly. It was showing “Object reference not set to an instance of an object” when try to select any item in visual studio as shown below:

image

To resolve this issue I have tried to repair the Visual Studio using Program and Features in Control Panel but still the situation is same. After doing some research I found that it is the issue with the configuration setting and common files for the visual studio located at following locations:

  1. C:\Users\{user}\AppData\Local\Microsoft\VisualStudio
  2. C:\Users\{user}\AppData\Local\Microsoft\VSCommon

Delete the content from these folders. If you do this way then all of your user settings such as Visual Studio layout, linked Microsoft account or start page settings get lost.

If you have installed multiple version of the Visual Studio then it is sufficient do delete folder ComponentModelCache on path
C:\Users\{user}\AppData\Local\Microsoft\VisualStudio\{version - 14 or 12}. It will preserve other setting of the Visual Studio. If it does not work then delete all content from the “Visual Studio” folder.

Some times it require to run “devenv /resetuserdata” command to reset the user data of the visual studio. I did it also using the Developer Command Prompt for Visual Studio Console but you can find this command tool at following locations:

  1. [x64] C:\Program Files (x86)\Microsoft Visual Studio 14.0\Common7\IDE
  2. [x86] C:\Program Files\Microsoft Visual Studio 14.0\Common7\IDE

image

Hope it will save time for someone rather doing uninstall or install for Visual Studio again.

Wednesday, June 29, 2016

New feature “Add a reference to a NuGet package” in Visual Studio 2015 Update 3

Microsoft announced the release of Visual Studio 2015 Update 3 two days ago. They have addressed issues from previous update and improved few things. In the list of improvements, I found an interesting thing that you can now quickly include NuGet packages by just using the resolve reference method. You can say it An option to add a reference to a NuGet package as a quick fix.

nugetbulb

You can enable this option from Tools > Options > Text Editor > C# > Advanced, under "Using Directives":

nuget

Visual Studio is improving in most of the expects for the development of the Universal Application development. There kind of improvements can make you more productive..

Monday, May 2, 2016

How to create Node.js development environment in Visual Studio?

Now Visual studio is enriched with the tools that turn Visual Studio into a powerful Node.js development environment. Node.js Tools for Visual Studio is free and open source plug-in built on top of Visual Studio 2012, 2013, or 2015. This tool has enable following feature for Node.js development:

  • Intelligent code completion
  • Advanced debugging and profiling
  • Integration with other Visual Studio features and 3rd party tools
  • Node.js, io.js, JavaScript, Typescript, HTML, CSS, and JSON support

Installation:
To create Node.js development environment in Visual Studio follow the below steps:

  1. Install Visual Studio
    Node.js Tools for Visual Studio supports Visual Studio 2012 Update 4, Visual Studio 2013 Update 4 and higher. It also support community version of Visual Studio. Visual Studio Community is a free, fully featured, and extensible IDE for individual developers, open source projects, academic research, education, and small professional teams. Create applications for Windows, Android, and iOS as well as web applications and cloud services. Build apps for any platform. Use designers, editors, debuggers, and profilers in a single tool. Access thousands of extensions and more. Go to Visual Studio download page and download which flavor of Visual Studio application you want to use.
  2. Install Node.js Tools for Visual Studio
    Node.js Tools for Visual Studio installs via msi installer and takes few minutes. Just download the appropriate version of the tools according to the Visual studio that you have installed. The latest release of tools is Node.js Tools 1.1.1 and if you have installed Visual Studio 2012 or 2013 then download tools that relevant to your Visual Studio installation.
    clip_image002_thumb[2]
    After downloading the tools follow the installation wizard to complete the installation. Currently I am using Visual Studio 2013 so I am using tools compatible with Visual Studio 2013.

    clip_image003_thumb[1]
    Click next and then accept License agreement to complete the installation.
  3. Install Node.js and Get Started with Node Tools for VS
    in last step, we need to install Node.js interpreter and Azure tools (for deployment). Actually Node.js Tools for Visual Studio requires a Node.js interpreter to be installed to work with Node.js. Node.js is built for 32-bit and 64-bit architectures.
    Node.js (x86): https://nodejs.org/dist/v0.12.7/node-v0.12.7-x86.msi
    Node.js (x64): https://nodejs.org/dist/v0.12.7/x64/node-v0.12.7-x64.msi
    Azure Tools:
    Azure Tools for VS 2015: http://go.microsoft.com/fwlink/?LinkId=534216
    Azure Tools for VS 2013: http://go.microsoft.com/fwlink/p/?linkid=323510
    Azure Tools for VS 2012: http://go.microsoft.com/fwlink/p/?linkid=323511

Now we are ready to start working with Node.js in Visual Studio and going to see the installed temples for the Node.js projects.
To create a project, Select New Project from File menu. You will find Node.js templates in Installed Templates under JavaScript section. Click on Node.js and you will find several template to create Node.js projects.

clip_image005_thumb[2]

Select “Blank Node.js Web Application”. Enter a project name “NodejsWebAppTest” and location and click OK.

Once Visual Studio completes the process to create the project then it opens “server.js” file in the editor. It is just like a program which prints “Hello world” on the console.

var http = require('http');

var port = process.env.port || 1337;

http.createServer(function (req, res) {

res.writeHead(200, { 'Content-Type': 'text/plain' });

res.end('Hello World\n');

}).listen(port);

Now press F5 to run the application in browser. In my case what happened, I missed the step 3 – Installing Node.js. Due to this reason an Information dialog appear on my screen telling that you have not installed Node.js.
clip_image006_thumb[1]

Then I have to download Node.js and install it before running this application again. Here are the steps to install Node.js:


  1. Run the downloaded application and it will popup below welcome screen. Click Next.
    clip_image007_thumb[1]
  2. Accept License agreement to complete this step and then click Next.
    clip_image009_thumb[1]
  3. After this step it will ask you to specify the destination folder where it should be installed.
    clip_image011_thumb[1]
    This is global installation of Node.js which is referenced in the projects. We can specify the path to a local interpreter in each of your Node.js projects.
  4. After that click next and at last step, click install to start installation process.
    clip_image013_thumb[1]

When this process complete then again try to run the application. Just press F5 and you will see the results in the browser.

clip_image015_thumb[1]

Conclusion:
Now we have a Node.js development environment up and running in Visual Studio. There are lots features included in the IDE for development of Node.js as we are debugging a C# code. E.g. Debugging, IntelliSense, Profiling and Interactive windows also.

Thursday, July 9, 2015

How to resolve “The 'DesignerPackage' package did not load correctly” issue??

It was the today morning I just start preparing to do my work and opened Visual Studio. Now what I found that there was lots popup showing the error for load fail of the designer packages respectively.

The error  was “The 'DesignerPackage' package did not load correctly” and I did following trick to solve this issue in Visual studio 2013. If you are using older version then look for 11.0 or 10.0 folder for this “ComponentModelCache” directory.

  1. First open windows explorer and go to “C:\Users\<your users name>\AppData\Local\Microsoft\VisualStudio\12.0\ComponentModelCache”.

    Remove_ComponentModelCache
  2. Delete all the files located in this folder after closing the visual studio.

After doing this start your visual studio and all errors went away.