Showing posts with label Visual Studio 2017. Show all posts

Tuesday, May 21, 2019

How to remove TFS workspace mapping for a user

Introduction

In this article, you will know how to remove TFS workspace mapping for a different user. In a remote environment, multiple users log in to a remote machine and create their workspaces that cause an access conflict for mapped workspace folder.

Scenario

Today I faced an issue while trying to update a mapped TFS workspace in Visual Studio 2017. Visual Studio stops responding if I try to open “Source Control Explorer” and found that some different TFS user connects to TFS and mapped some folders on my local drive. Now I need to access that mapped workspace folder because I do not want to create another folder for myself.
I tried mapping same remote folder to my existing local folder and I got the following error:
“The working folder ‘Workspace_Folder_Local_Path’ is already in use by the workspace WORKSPACE_NAME:USER_NAME on computer ‘MACHINE_NAME’”

Remove TFS workspace user mapping

Prerequisites:

  • You should have administrative rights to the collection.
  • TF command. ( it is located at “C:\Program Files (x86)\Microsoft Visual Studio\2017\Professional\Common7\IDE” depend upon your Visual Studio version.

Steps to remove user workspace mapping

  • Run “Developer Command Prompt for VS 2017” from Start menu.
  • List the workspaces associated with the user using the below command:
      TF workspaces /collection:"http://tfsserver:8080/tfs/collection_name" /owner:owner_id
    
    This will return the list of workspaces owned by the user and computer they are associated with. For owner_id, you use the user name e.g. Niranjan Singh
  • To remove user workspace mapping, run the below command:
      tf workspace /delete workspacename;owner_id 
    
    Now it will confirm you to delete the user mapping. Enter 'y' to initiate the process.
    Remove TFS Workspace Mapping for a user

Conclusion

These are the steps to delete the TFS workspace mapping for a user.

Thursday, January 24, 2019

How to enable docker support ASP.NET applications in Visual Studio

Introduction

In this article, you will know that how to enable docker support for ASP.NET application in Visual Studio. We will create an ASP.NET Core application docker support and also enable docker support in an existing application.

Prerequisites

  • Docker for Windows
  • Visual Studio 2017 or later with the .NET Core cross-platform development workload

Enable Docker support in a new application

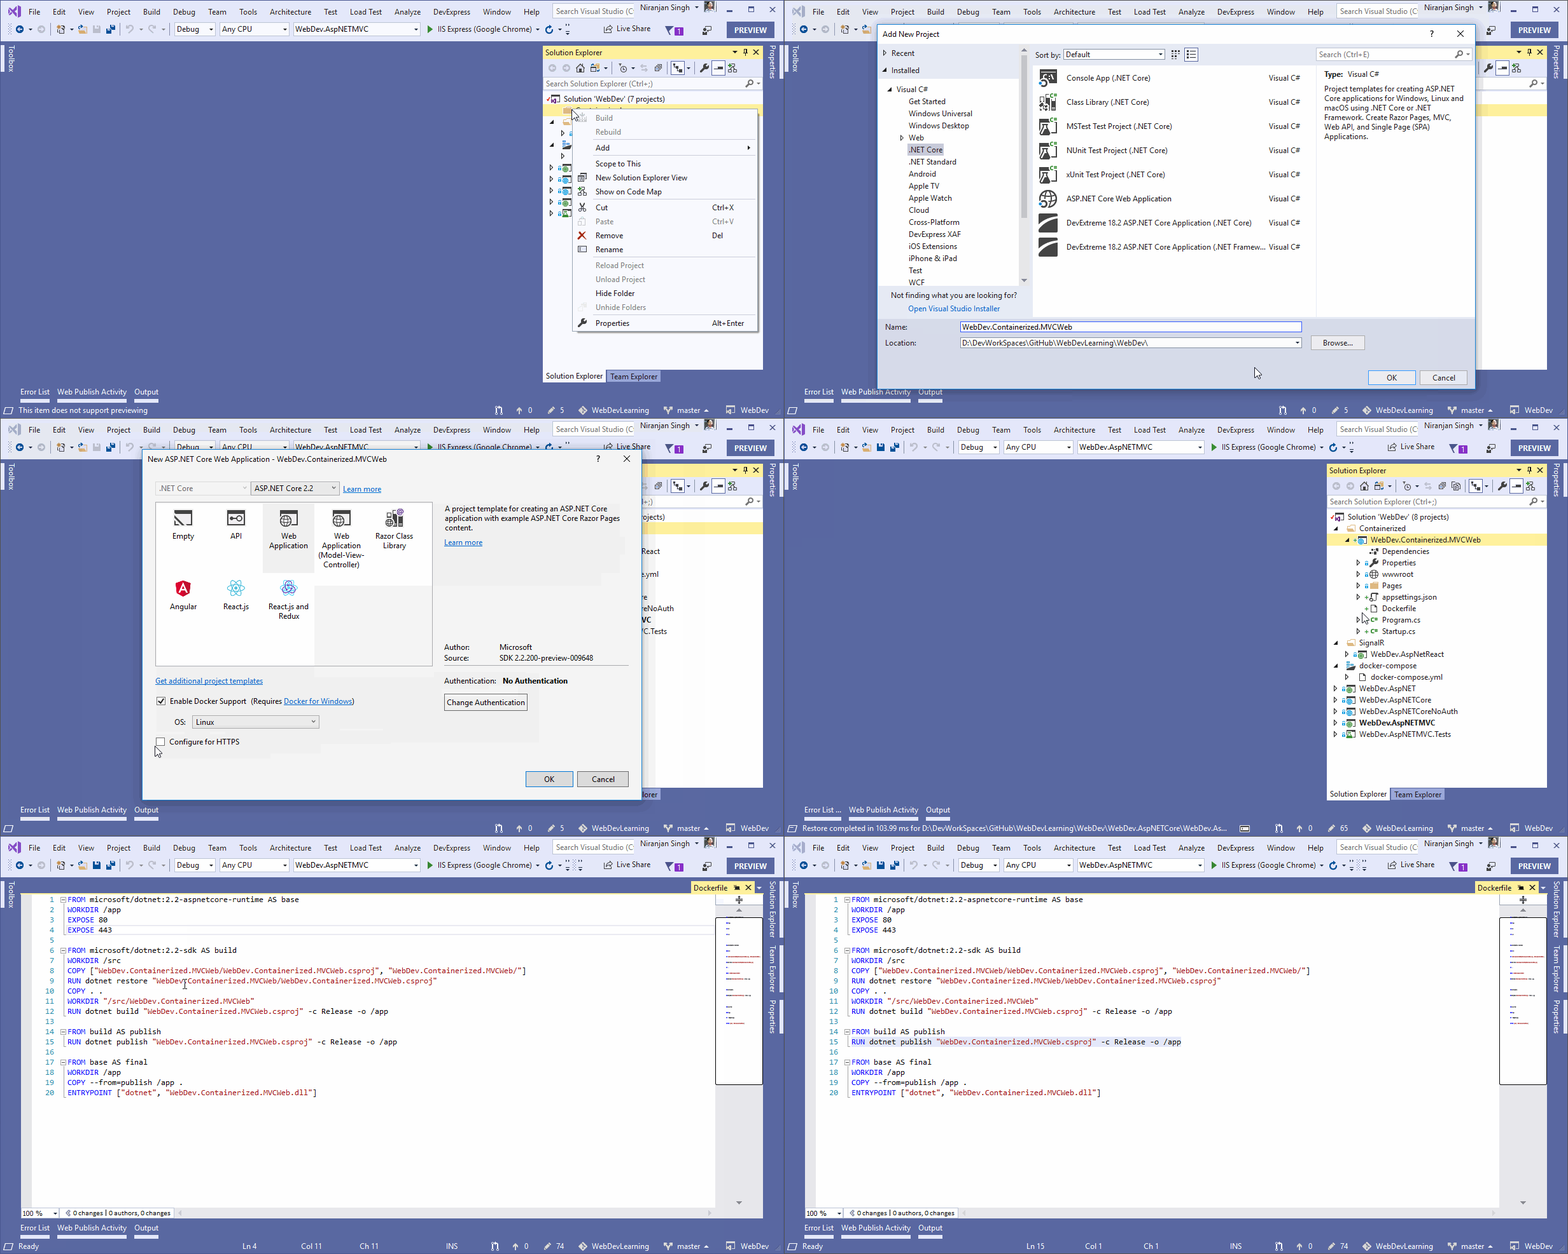
You can get Docker support in your project when you create a Visual Studio web project, either. NET Core or the full framework. If you choose the .NET Core framework, you get the option to add Docker support in the new project wizard but for the full framework, we can add Docker support later context menu “Solution Explorer”. See below steps to create a .NET Core project with Linux container support:

clip_image001

Docker tools in Visual Studio understand the difference between. NET Core and the. NET full framework so the generated files will nicely reflect those different targeted platforms.

To add Docker support for the full framework, go through previous post - Containerizing a .NET application

Enable Docker support in a new application

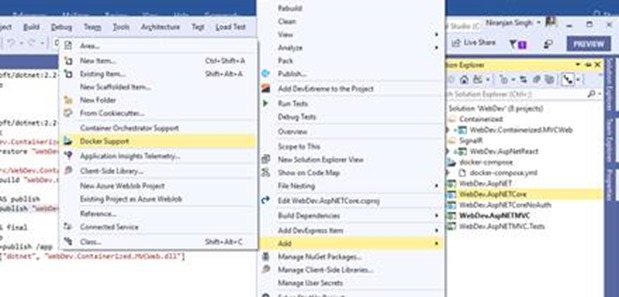
You add Docker support after creating a project is by right-clicking the project in the “Solution Explorer” and then select “Docker Support” option under the Add submenu.

clip_image003

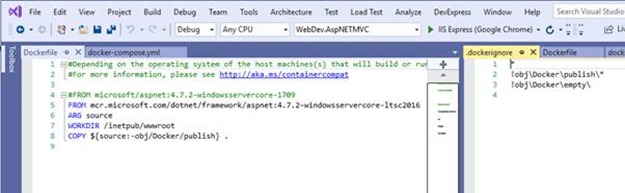
Visual Studio will add DockerFile and .dockerignore to the project that will be used to build a docker container image starts with a reference to the base image dotnet:2.2-aspnetcore-runtime.

clip_image005

Note: To build this container, you need to switch the Docker tools for Windows on your machine to run Linux containers. If it is targeting to different operating system type, then you would get errors during the build since you can't mix Linux containers with Windows containers.

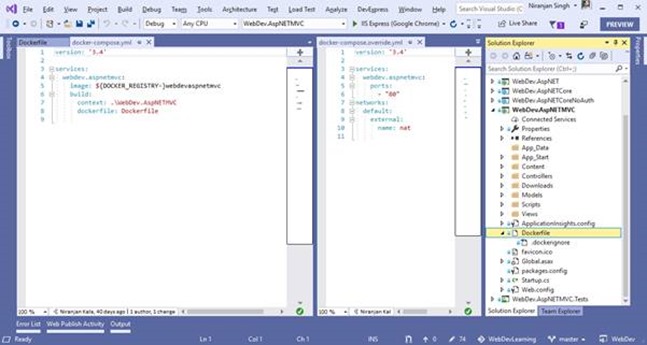
Docker support also added the generated YAML files. YAML files can be used together with docker-compose to execute Docker commands to a set of containers instead of only one at a time so that multiple container can work together for the microservices scenarios.

docker build -f "D:\DevWorkSpaces\GitHub\WebDevLearning\WebDev\WebDev.Containerized.MVCWeb\Dockerfile" -t webdevcontainerizedmvcweb:dev

clip_image007

Build Docker image from CLI

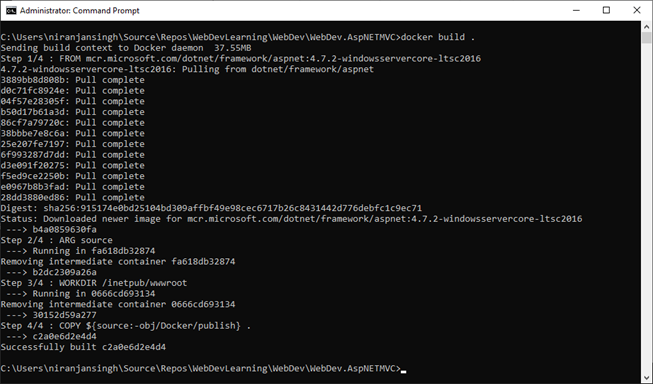
Open command prompt in administrative mode and run the below command  in project folder:

C:\Users\niranjansingh\Source\Repos\WebDevLearning\WebDev\WebDev.AspNETMVC>docker build .

clip_image001

Running application under Docker Environment

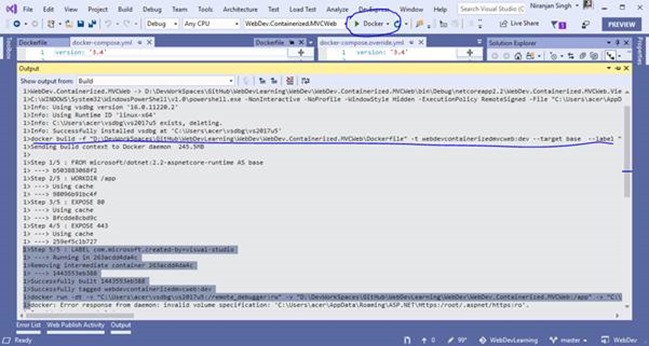
For .NET Core framework applications, Just run the application by selecting the Docker option just after the Run arrow button. After that application will build and create Docker image according to the settings provided in the DockerFile.

clip_image009

For my case application is targeting “Linux” and Docker for Windows on my system is configured to run the Windows contains so it will not build my case. So, remember to switch particular target Operating system containers before you build the application.

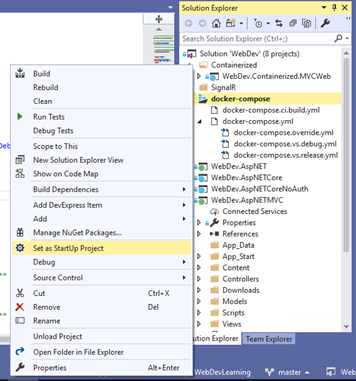
For a .NET framework application, make docker-compose as startup project. After this modify the .yml files to build and run the contains.

image

You will see Docker Compose button on the place of “Docker” in .NET full framework applications.

image

Click on Debug button to let the docker decompose to build and run the docker image on the bases of yml file configuration.

Wednesday, September 19, 2018

Enable code preview with the Visual Studio enhanced scroll bar

Introduction
This is the first time that I saw code preview through scrollbar in Visual Studio. I have use most of the Visual Studio IDE starting from Visual Studio 2002 and scrolling of code files done using the classic scrollbar.
Starting from Visual Studio 2013, an enhanced scrollbar feature is enabled but I was not aware of it till now. Recently I saw below code preview features through a wide scrollbar:
image
Enabling Visual Studio scrollbar code preview mode
By default, this feature is not enabled so that I have not used this cool feature before. Actually, it requires to switch the scrollbar mode and below are the steps to switch scrollbar mode:
  1. Open option using Tools menu and select “Options”
  2. In the options dialog select the Text Editor | All Languages | Scroll Bars node from left side menu
  3. Now change the scrollbar behavior to map mode and check the “Show Preview Tooltip” checkbox as shown in below image.
    Visual Studio enhanced scrollbar
I found it a cool feature which enables the developer to view the see the code in tool-tip by hovering on the scrollbar without scrolling down to the bottom of the code file.

You can find detailed information at Visual Studio scroll bar customization documentation.


Friday, August 24, 2018

Create/Update an offline installation of Visual Studio 2017

Introduction
In this article we learn that how to create an offline installer for Visual Studio 2017. Recently Visual Studio 2017 version 15.8 Released and then i have updated Visual Studio 2017 on my laptop. I have another machine which does not connect with high speed internet so I need to install Visual Studio through offline installer (ISO).

Microsoft designed Visual Studio 2017 installer to install specific modules (workload-based model) and allows to install minimal set of features to start development using Visual Studio.

Create Visual Studio 2017 offline installation media
Step 1 – Download the Visual Studio installer setup
It is recommended to use Visual Studio web installer because it will always install/ update to the latest version of the Visual Studio 2017.

Visual Studio 2017 Installer

Download the latest version of Visual Studio 2017 Web installer by clicking below links
Visual Studio Community 2017 | Visual Studio Professional 2017 | Visual Studio Enterprise 2017


Visual Studio 2017 Installer

Step 2 – Create/ Download installation setup files
To create updated version installation for Visual Studio, use the below command create or update the existing installation layout to a newer version. You don't have to specify any additional command-line parameters.
vs_enterprise.exe --layout d:\vs2017ent
It will create a complete local installation media for Visual Studio 2017 with all features and definitely it will take lots of time to download all the work loads.
You can also specify the language at the Visual Studio to download so that it will download installation files for the specified set of languages only
vs_enterprise.exe --layout d:\vs2017ent --lang en-US
In my case, I have already downloaded Visual Studio 2017 installation files earlier. This time I need to update this installation layout to transfer update on my offline computers.

image

Once the offline installation files saved at the specified location then transfer it on another computer and ready to install the Visual Studio 2017.

clip_image002

Click the vs_setup.exe file to start the installer then install the Visual Studio after selecting the required development environment features you want to install.

Clean up previous version obsolete package


During the update process of existing Visual Studio installation files, my computer drive gets full and some of the packages failed to download. I checked the installation layout folder and found that there are previous version packages also exists. I have removed few of them manually to complete the download process.

Visual Studio installations files folder size incrementally increase whenever we update the existing installation files. Visual Studio installation folder may have some obsolete packages that are no longer needed by the latest Visual Studio installation.

You can use the --clean option to remove obsolete packages from an offline cache folder.

Step 1 – Find file path(s) to catalog manifest(s) that contain those obsolete packages

You can find the catalog manifests in an "Archive"folder in the offline layout cache. They are saved there when you update a layout. In the "Archive" folder, there is one or more "GUID" named folders, each of which contains an obsolete catalog manifest. The number of "GUID" folders should be the same as the number of updates made to your offline cache.

Step 2 - Run the “—clean” command by supplying the files paths to these catalogs


vs_enterprise.exe --layout d:\vs2017ent --lang en-US --clean d:\vs2017ent\Archive\d88a0497-7bee-42ad-8ea5-3361cd52e075\catalog.json


References:
Create an offline installation of Visual Studio 2017
Install Visual Studio 2017 on low bandwidth or unreliable network environments
Update a network-based installation of Visual Studio


Monday, October 30, 2017

How to fix error TFS connection error "You are not authorized to access …"

In this article we will know that how to fix the error when connecting a project collection in Visual Studio with Source Control Explorer open (TF30063: You are not authorized to access… project)

Scenario:
Recently, I must change my Active Directory account password due to password policy which force the user to change the password after few days. In my development environment TFS require AD credentials to connect with TFS services.

Solution:
Peoples from developer community suggested various ways to solve this issue. Few of them explained as below:

  1. One probable solution is clearing the Internet explorer 9 and above cache completely. The Team Foundation Server login apparently uses Internet Explorer which can be launched from Visual Studio though and It may conflict or try to match with cached credentials. After the cache clearing, Visual Studio ask to the correct login details screen or authenticate automatically.

    clip_image001

    Now logout from portal and login again with updated credentials

    clip_image003
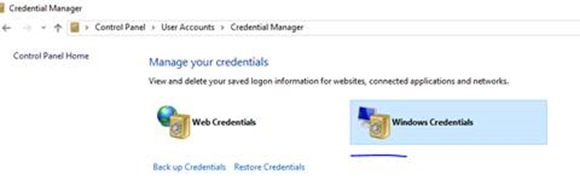
  2. In my case removing the entry from credential manager which cached the previous password for the TFS connection.

    clip_image005

    Find and remove entry from web or Windows credentials where you find for your TFS service. I need to remove it from Windows Credentials

    clip_image007

    Restart Visual Studio and Then it worked again.
  3. Sometimes this problem gets resolved by clearing TFS cache from below location "C:\Users\%UserName%\AppData\Local\Microsoft\Team Foundation\7.0\Cache". Just press Win+R on keyboard and paste this path. Remove the cache and reconnect TFS with valid credentials again. It works if you are using multiple logins to connect the TFS Services.

Conclusion:

We have discovered ways to solve the TFS issue. It may work one of them to someone’s problem.

Tuesday, March 7, 2017

Visual Studio 2017 Launched with new features…

Currently Visual Studio 2017 launch 20th Anniversary event is still running on 7 and 8 March. One day still left to  explorer know that what Microsoft brought in this version. There are lots improvement in this version of Visual Studio.

First one is the New Installation user interface which make it easier for you to select and install just the features you need. You can select individual components that you want to use in development environment.

image

image

Visual Studio has been optimized to reduce startup time and solution load time. The very first launch of Visual Studio is at least 50% faster.

Improved Code Navigation
There are huge improvements to code navigation features in Visual Studio 2017. It is changed to “Go To All (Ctrl +, or Ctrl + T)” lets you quickly find and go to files, types, methods, and other elements in your code. It allows you to locate items of any kind, even in large code bases. Go To Line is also improved.
  • Structure Guide Lines are now drawn in the editor so that you can easily visualize the structure of the code that you are working in. On mouse hover, a tooltip is displayed containing the context of the current code block relative to its ancestor blocks. Structure Guide Lines are currently supported for C#, Visual Basic, and XAML files, and for any files supported via TextMate grammars. This feature may be disabled in the Tools > Options dialog by unchecking the Show structure guide lines checkbox under the Text Editor > General category.

Coding Convention Support Via EditorConfig

The Visual Studio 2017 editor now supports EditorConfig, which allows developers to define and maintain consistent coding style conventions between different editors and IDEs. See documentation for more details, and .NET documentation for information on how to use .editorconfig files to govern your .NET code style. See known issues for limitations in EditorConfig support in this release.

Read this nice article - Code Style Configuration

Code Refactor improvement

Visual Studio provides lots of refactorings to help you be productive and make your code more readable. for example,

  • Simplify object initialization with an initializer.
  • Use specific type rather than var.
  • Convert String.Format to string interpolation [ “AA” + abc.ToString() to string.Format(“{0}{1}”, “AA”, abc.ToString()],
  • Convert property to a method, and vice versa.
  • Move class declaration to another file.

There are lots refactoring features included in Visual Studio 2017 which are provided by third-party tools e.g. Redgate Refactor and DevExpress CodeRush. I am using DevExpress CodeRush for these features but some theme are already exists in Visual Studio 2017. It is really good that some basic refactoring features now part Visual Studio itself.

Debugging and Diagnostics

Now Visual Studio has significant changes in this section also.. Check few of them below:

Run to Click

Simply click the icon next to a line of code while debugging to run to that line. No longer set temporary breakpoints or perform several steps to execute your code and stop on the line you want. Now while stopped at a break state under the debugger, the Run to Click icon subtly appears next to the line of code that your mouse is hovered over. Move your mouse to the icon and click the button, now your code will run and stop on that line the next time it is hit in your code path. Turn it off from Debug> Options > Enable Run to Click.

Debug_Run_Right_Click

The New Exception Helper

Use the new Exception Helper to view your exception information at a glance in a compact non-modal dialog with instant access to inner exceptions. Read this blog post for more detailed information on the new benefits of the Exception Helper.

Live Unit Testing is the interesting one which captured my eyes during the first day launch event. It visualize unit testing results and code coverage live in the editor. A symbol is shown whether this line of code pass the unit test or not. It also shows that this line of code is captured by unit test or not.

There are lots features added in newer version of Visual Studio. It looks like ultimate editor for developers.